How to Add Liquidity
This page offers step-by-step instructions on how to provide liquidity to a Maverick Pool.
When you add liquidity to Maverick V2, you will mint a Maverick Position NFT. This NFT stores the details of all your liquidity position on Maverick, and is used to manage and remove that liquidity. The wallet that holds a Maverick Position NFT controls the liquidity associated with that NFT. Do not transfer or sell your Maverick Position NFT unless you want to give control of the liquidity to another wallet.
Users add liquidity to Maverick using the Add Liquidity page, which can be accessed from the menu at the top of the screen.
The Add Liquidity has two tabs: Boosted Positions and Pools. Boosted Positions are pre-configured positions within a pool that may also offer token incentives for LPs. They are covered in more detail in this section of the docs.
This guide will explain the process of adding liquidity to a regular pool, which will require you to choose a configuration for your liquidity.
Adding liquidity consists of three steps:
Let's look at each step in turn.
Select Pool
Once you have navigated to the Pools tab of the Add Liquidity page, the first step is to select the pool you want to add liquidity to. The Pools tab will present a list of pools that have already been deployed across all chains. You can filter the list by chain and by token.
You can choose a pool from this list or create a new pool from scratch. In this guide we'll assume you're choosing an existing pool from the list, since deploying a new pool costs more gas and is for users who have specific liquidity needs that are not met by the available pools. To deploy a new pool, follow our guide.
In order to add liquidity to a pool, you will need to hold at least one of the two pool tokens in your wallet. You can choose a pool from the list that includes tokens you already hold, or go to the Swap page to acquire tokens you will need for a pool.
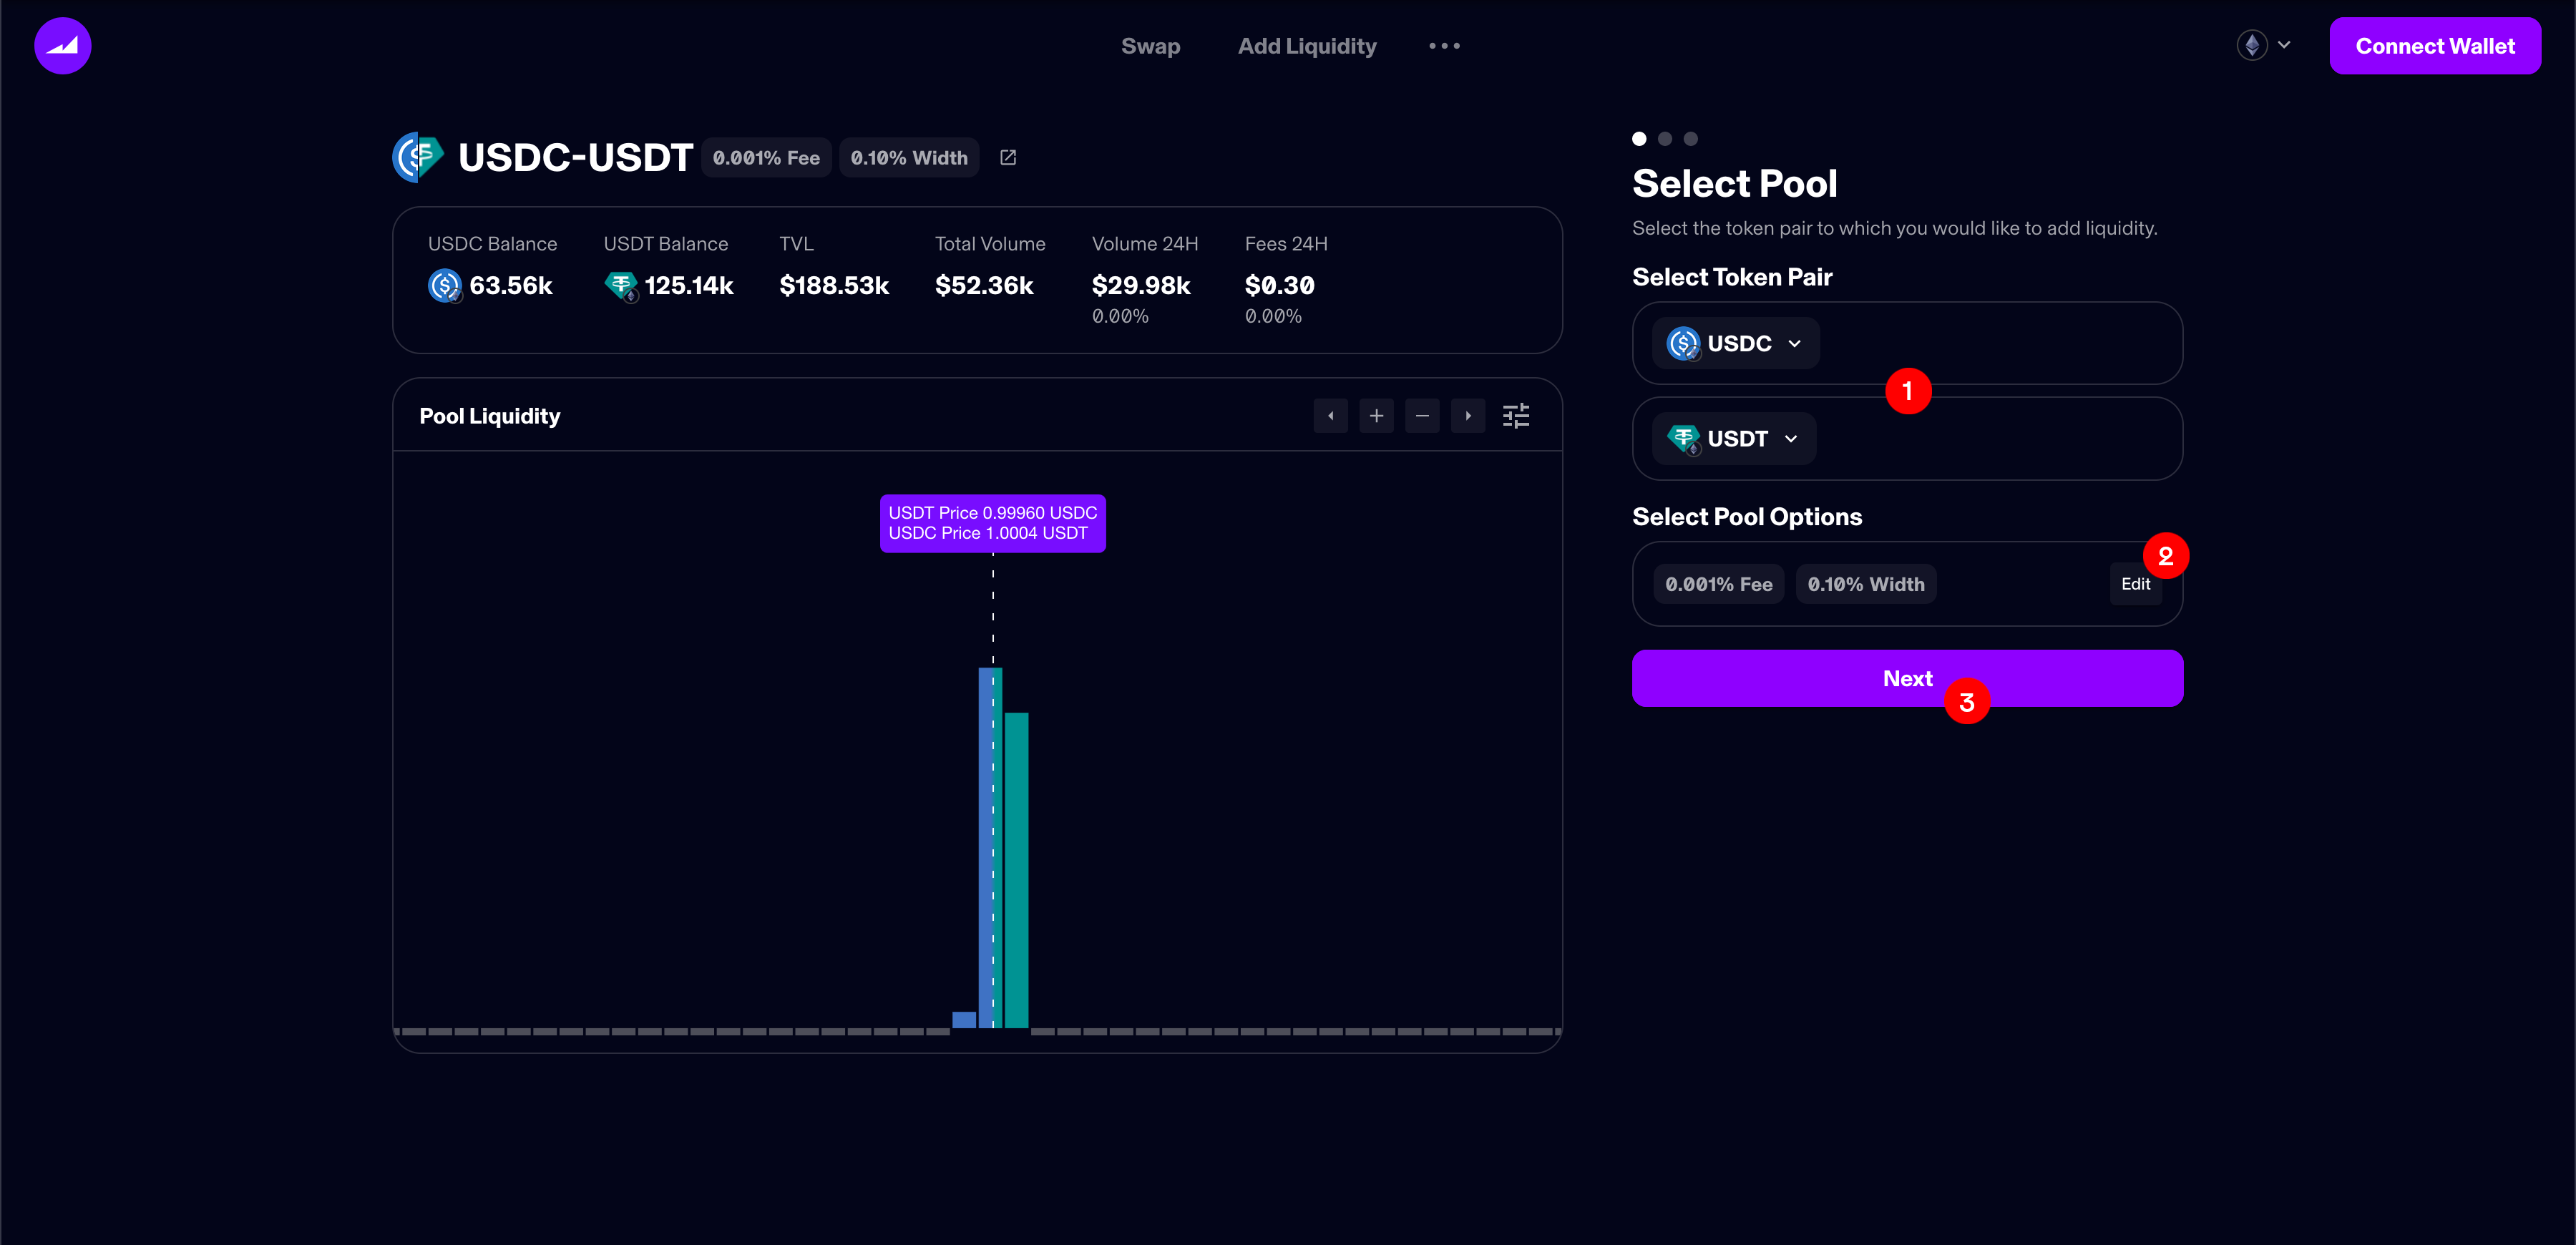
Click a pool will take you to the Select Pool screen. If you want, you can change the token pair you want to add liquidity to using the drop-down menus (1). You can also select a fee tier and bin width at which to add your liquidity. For more information on fee tiers, see the section in the FAQ.
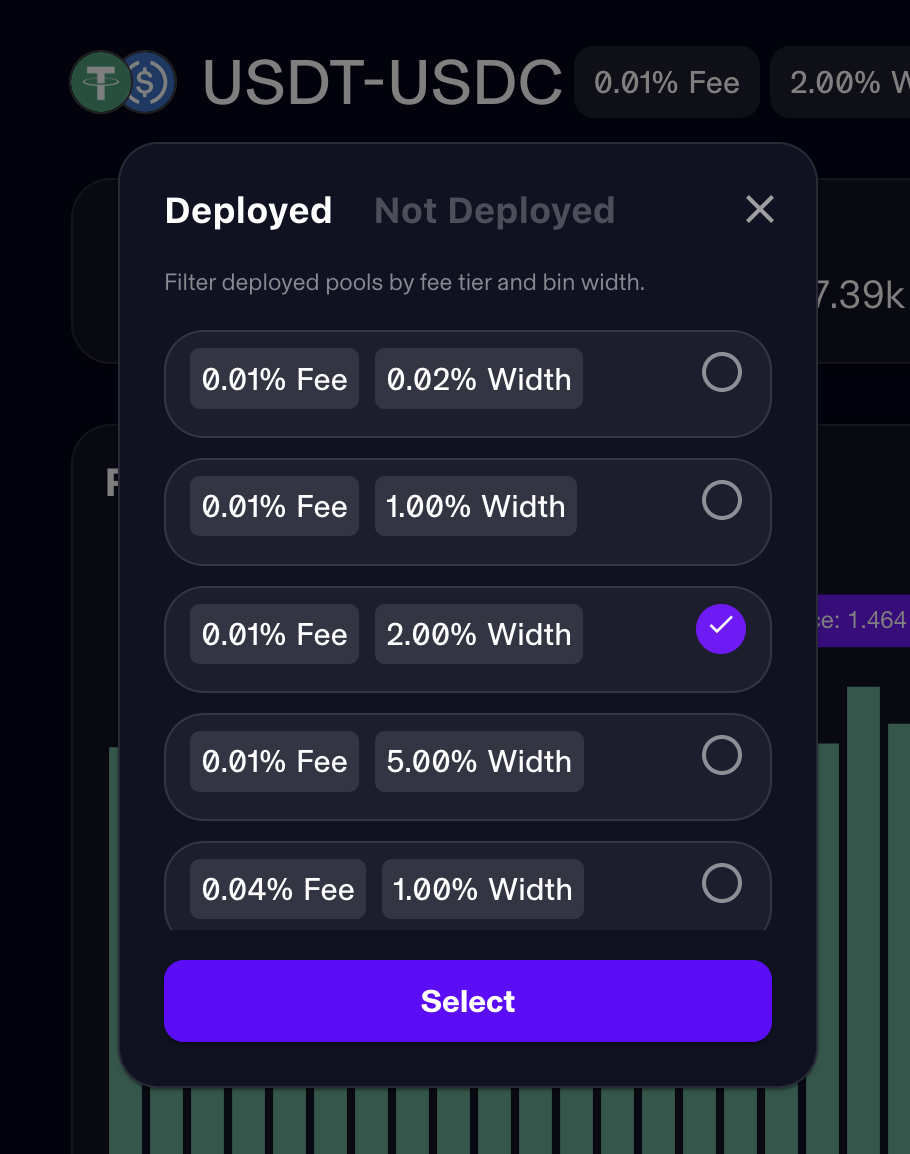
If you want to change the fee tier and bin width, you can click the Edit button (2). This will open a modal where you can choose between the pools that have been deployed for the selected tokens based on fee tier and bin width.
The modal lets you choose between pools that have already been deployed and pools that are not yet deployed. If a pool is deployed, it means that at least one other user has added liquidity to that pool. Pools that are not deployed have no liquidity in them and therefore are not yet active. If you use this modal to select a fee tier and bin width that has not yet been deployed, you will have to deploy the pool yourself.
Since there is a wide range of possibilities for combining different fee tiers and bin widths, it is unlikely that all combinations will have been deployed. For the purposes of this guide, we will assume you want to pick from a pool that is already deployed. If you want to deploy a new pool, please see our separate section on Deploying a New Pool.
The modal sorts pools in ascending order, first by fee tier and then by bin width. You can select the fee tier and bin width you want by clicking on it. This will cause a checkmark to appear by that pool, indicating your selection. Once you've chosen the pool you want, you can click the Select button to confirm your choice and close the modal.
The UI will load information about your chosen token pair and fee tier in the windows on the right, including TVL, volume, and an overview of the current liquidity distribution in that pool. If everything looks good, click Next (3) to continue.
Select Mode
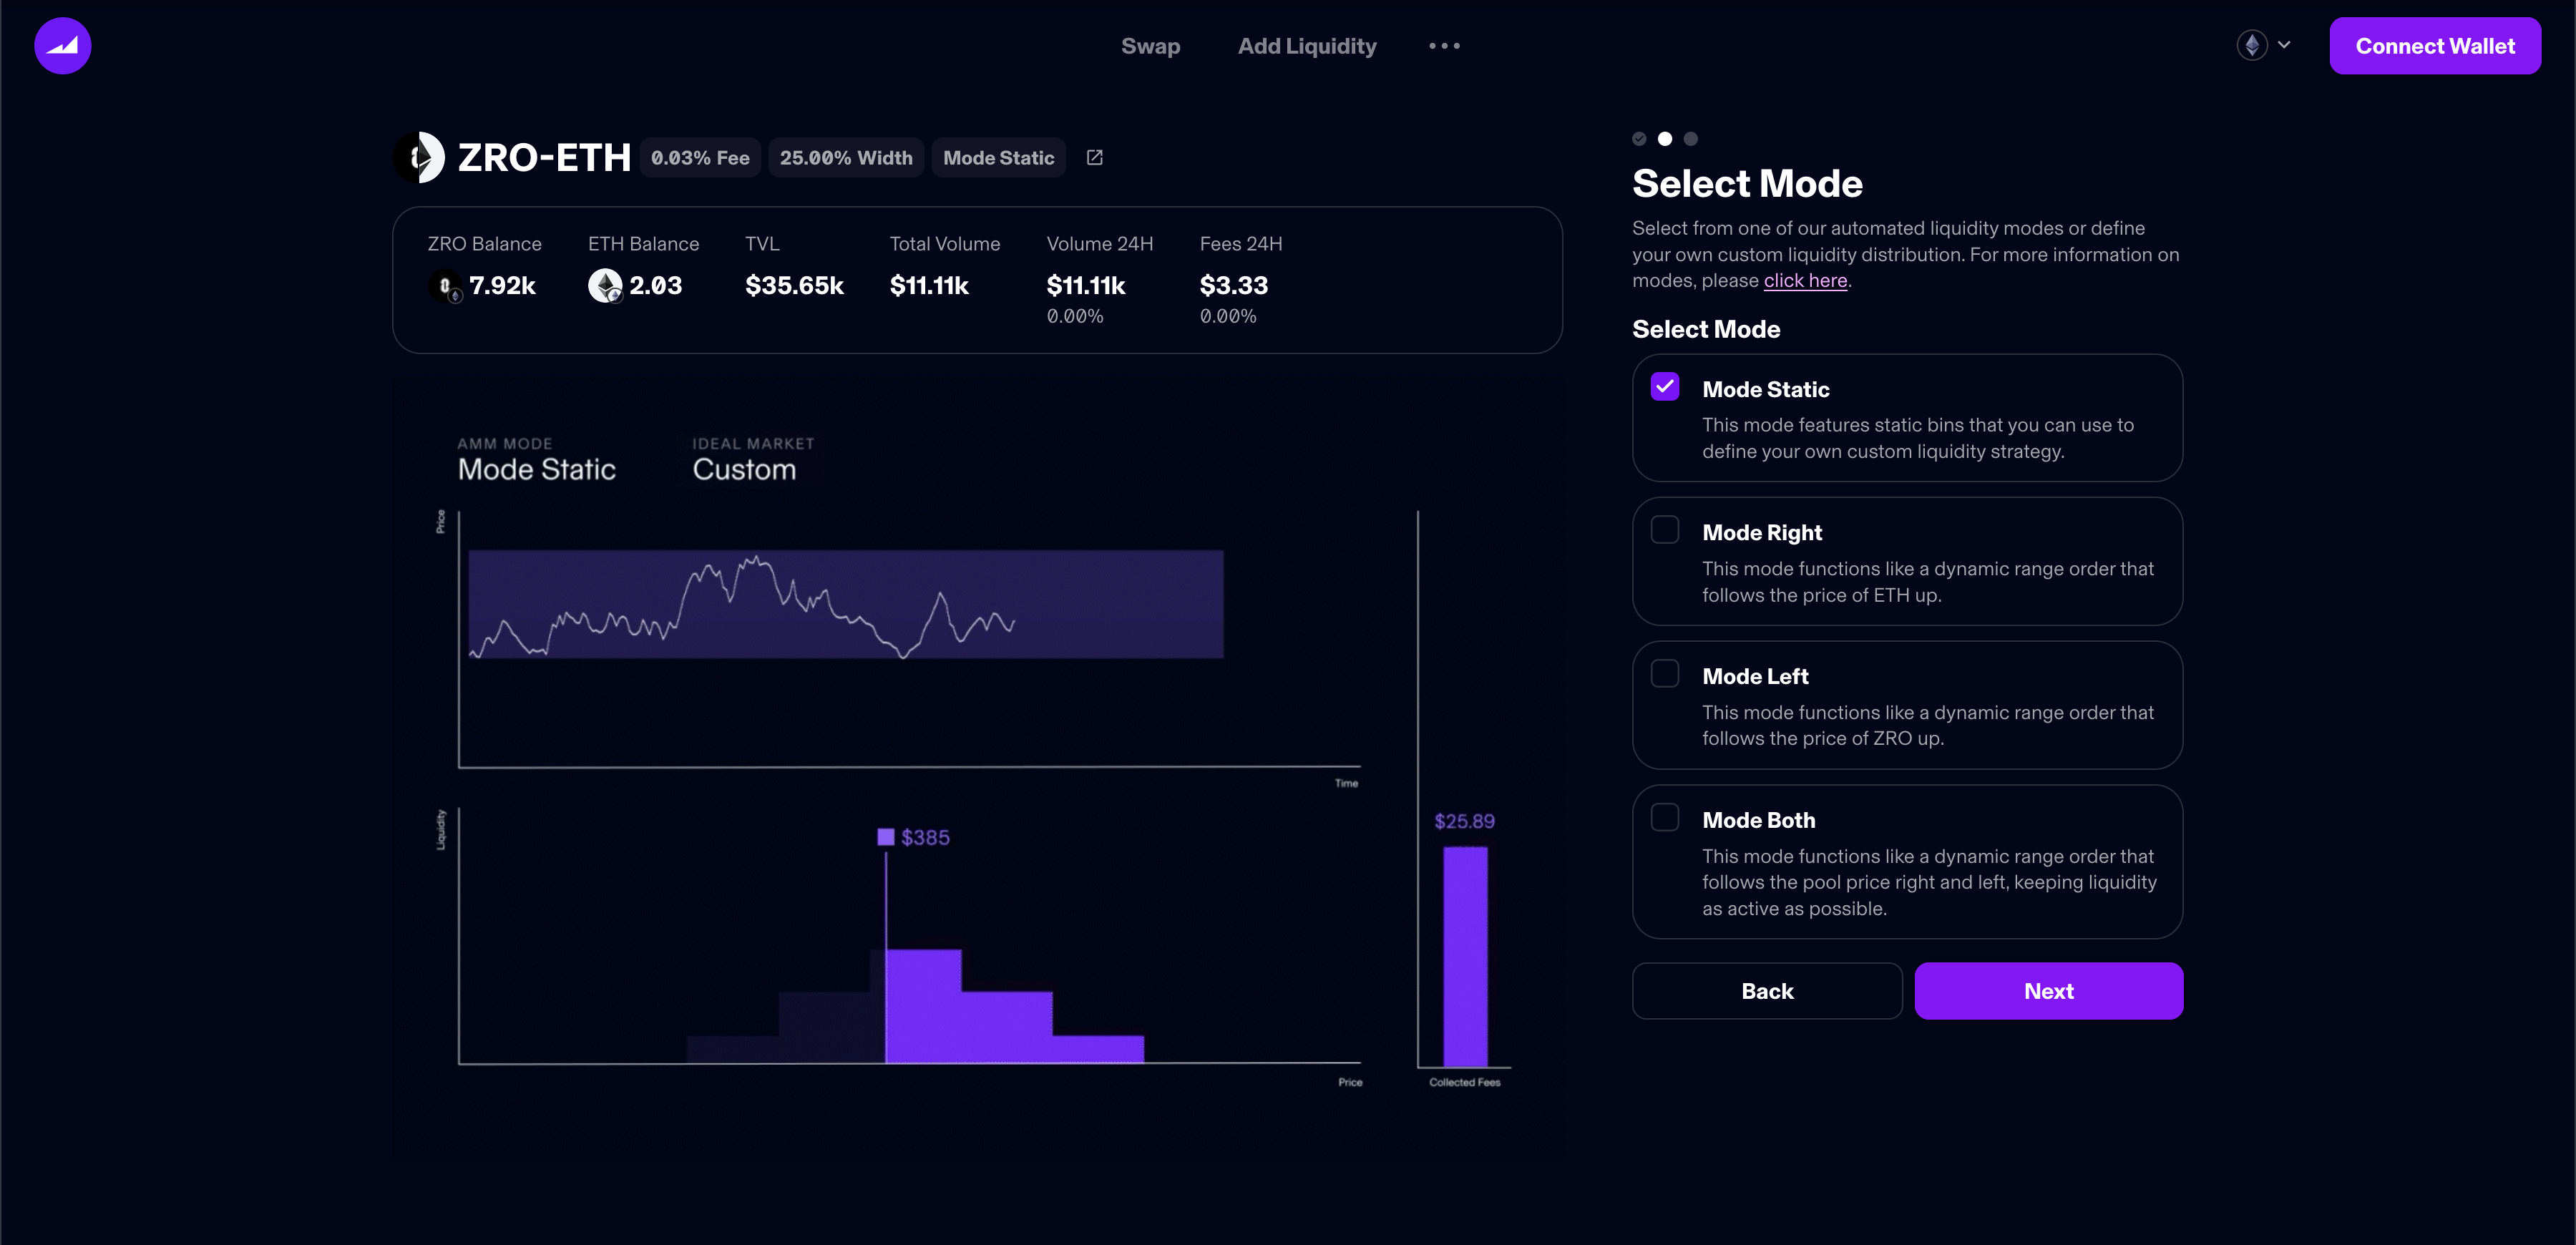
On the next page, you can select the liquidity mode. If you haven't already, now would be a good time to review our section on Understanding Modes. The Select Mode page presents a brief explanation of each Mode and accompanying video, but the section here goes into a lot more detail.
Select the desired Mode for your liquidity, then click Next to continue. Alternatively, you can click Back to return to the Select Pool page and change your token pair and/or fee tier.
Add Liquidity
In the final step, you choose how much liquidity to add from your wallet, as well as how that liquidity will be distributed within the pool.
Maverick AMM provides a lot of options for configuring liquidity distributions. Here, we'll walk through the basic mechanics for adding liquidity, starting with the three movement modes and then looking at Mode Static. Again, if you need help understanding Modes, please see the relevant section in this guide.
Adding Liquidity to a Movement Mode
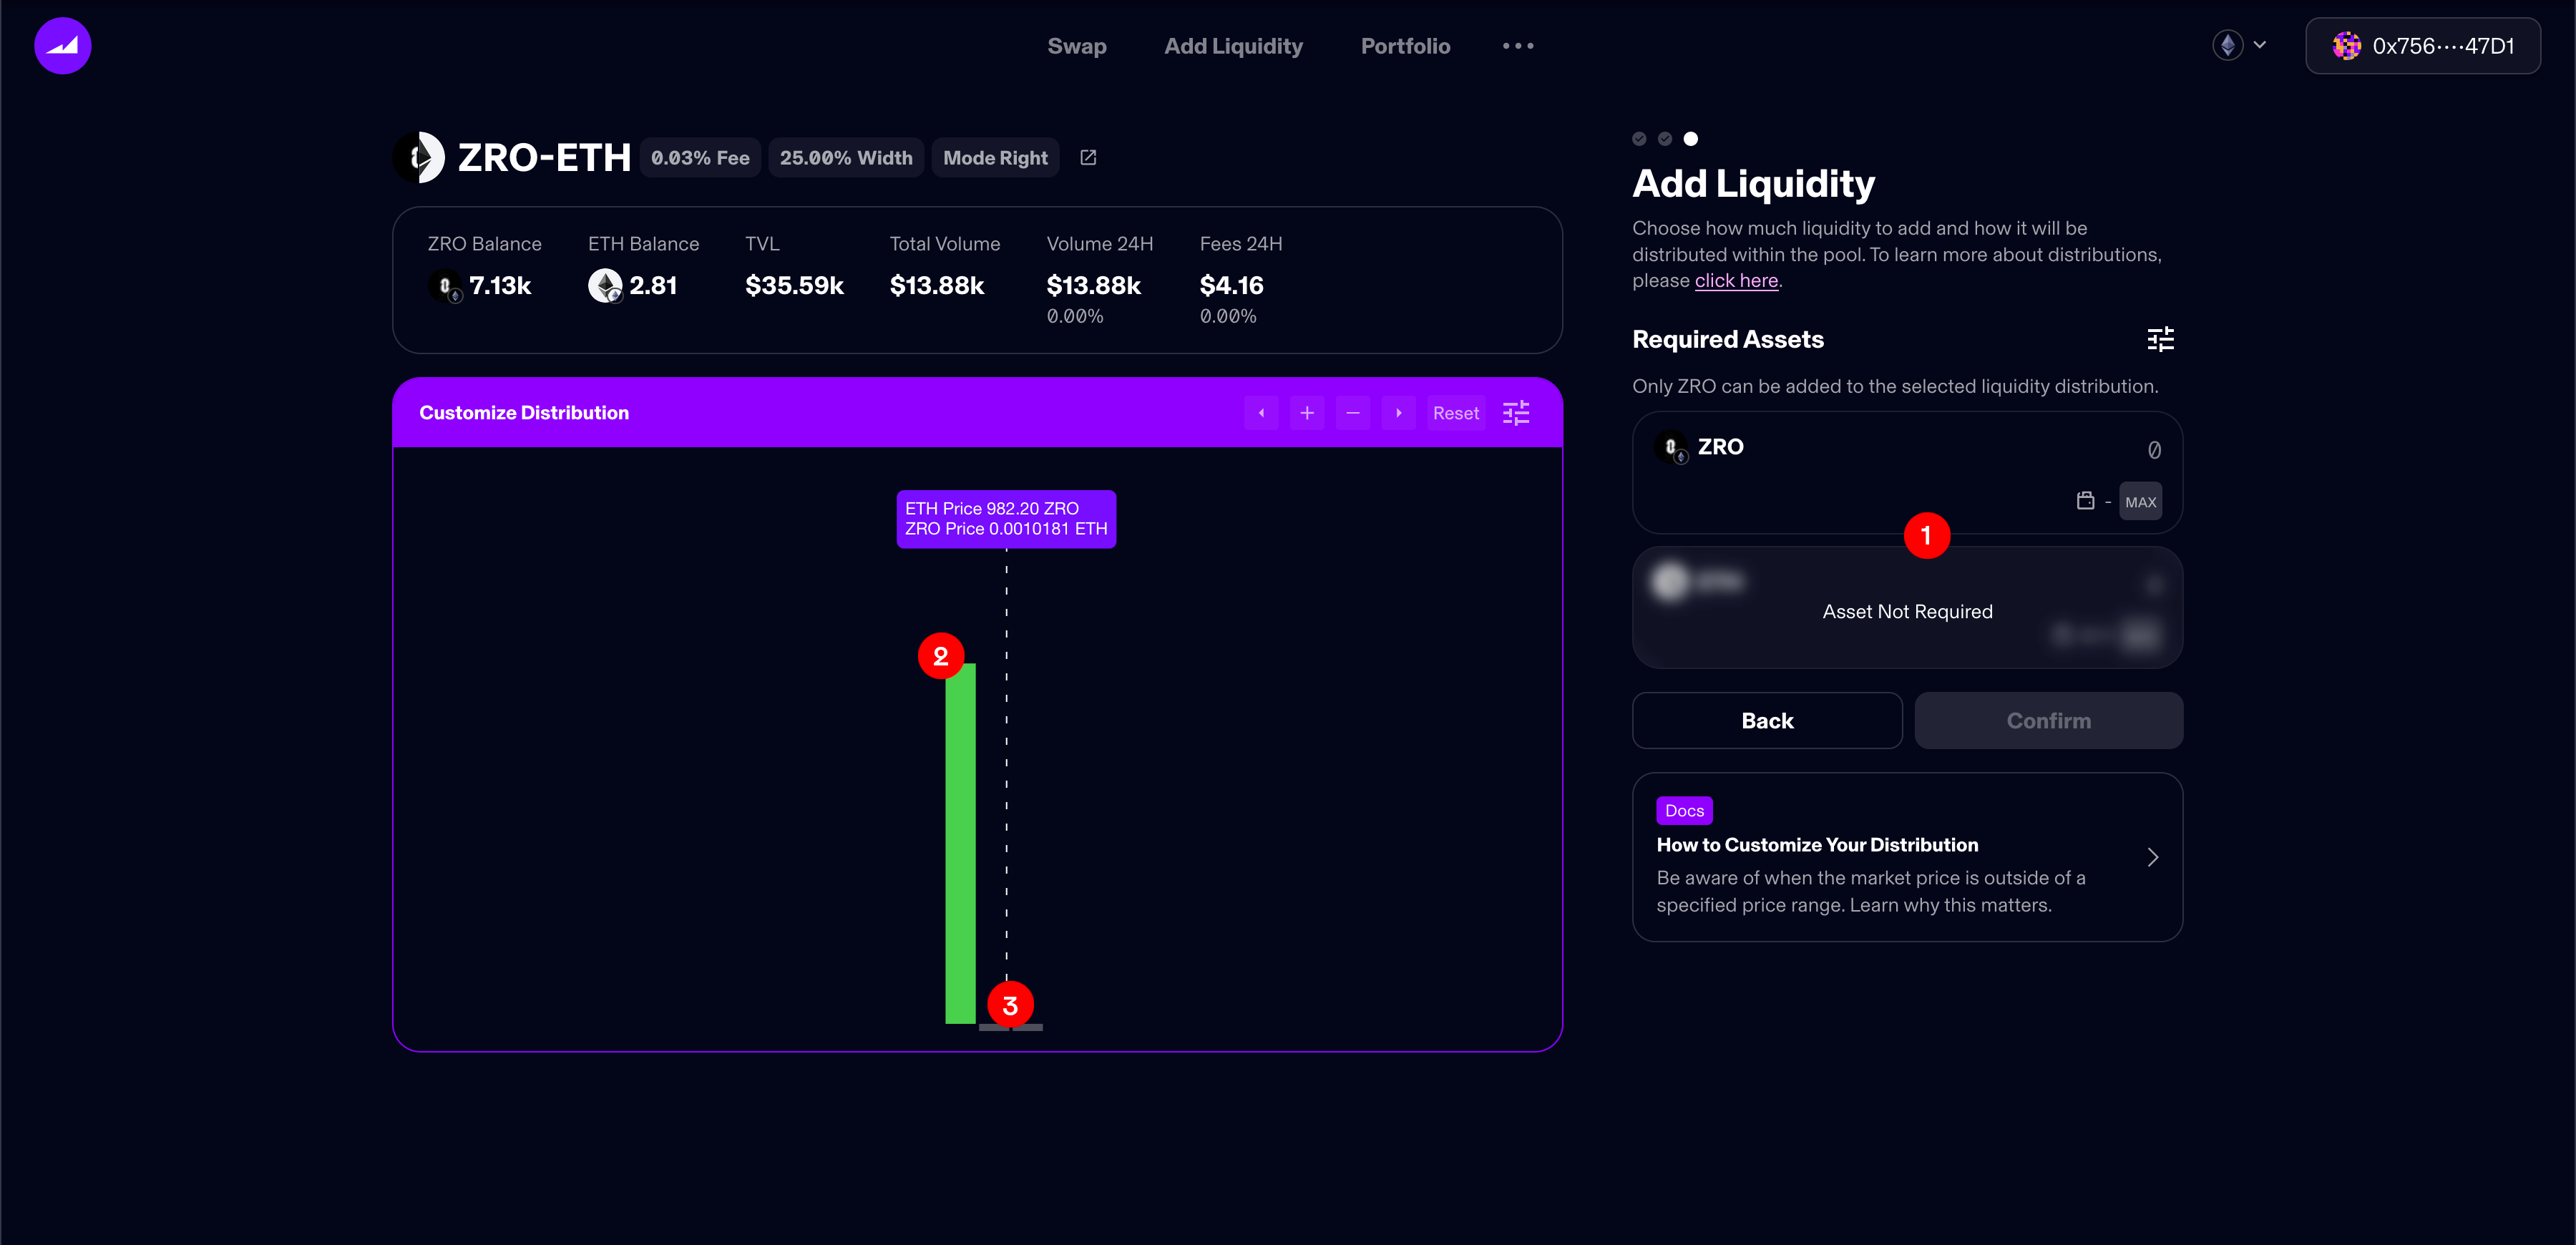
The screenshot above shows the Add Liquidity page after a user has selected Mode Right. The two token boxes on the right (1) are used to set the overall amount of liquidity you wish to add to the pool. These are interactive with the distribution chart on the right, meaning that the AMM will automatically compute the correct ratios of the two tokens required by your current distribution.
The default state for Mode Right is to add liquidity to the bin directly to the left of the current active bin. Since this bin isn't active, it will consist entirely of the left/base token (here, ZRO). This means that the current distribution will only require you to deposit ZRO, so adjusting the amount of ZRO in the token box on the left will have no effect on the other token box (here, ETH).
You can adjust the amount of ZRO being added by grabbing the top of the bin (2) and dragging it up and down. in height corresponds to amount of liquidity in the bin, and as you move the bin heights you will see the amounts on the left change accordingly. Since the bin we're looking at contains only ZRO, changing its height will only change the amount of ZRO to be added.
In Mode Right, you can also choose to add liquidity to the current active bin or the bin to its right. To do this, click on the tab for that bin (3) and drag it up. The active bin will contain both tokens, and so once it is active you will need to deposit quantities of both. In this example, if we activated this bin we would see the amount of ETH increase in the token box on the left.
The bins for the three movement Modes behave similarly, with these important differences:
Mode Right: starts with bin to left of active bin, active bin and bin to its right can be staked as well
Mode Left: starts with bin to right of active bin, active bin and bin to its left can be staked as well
Mode Both: starts with active bin, bin to right and/or left can be staked as well
Default bins were chosen for what is theoretically the ideal use-case for each Mode, but users are also offered the flexibility to find other uses for all of the Modes.
Once you have finished customizing the size and distribution of your position, you can click Confirm to continue.
Adding Liquidity to Mode Static
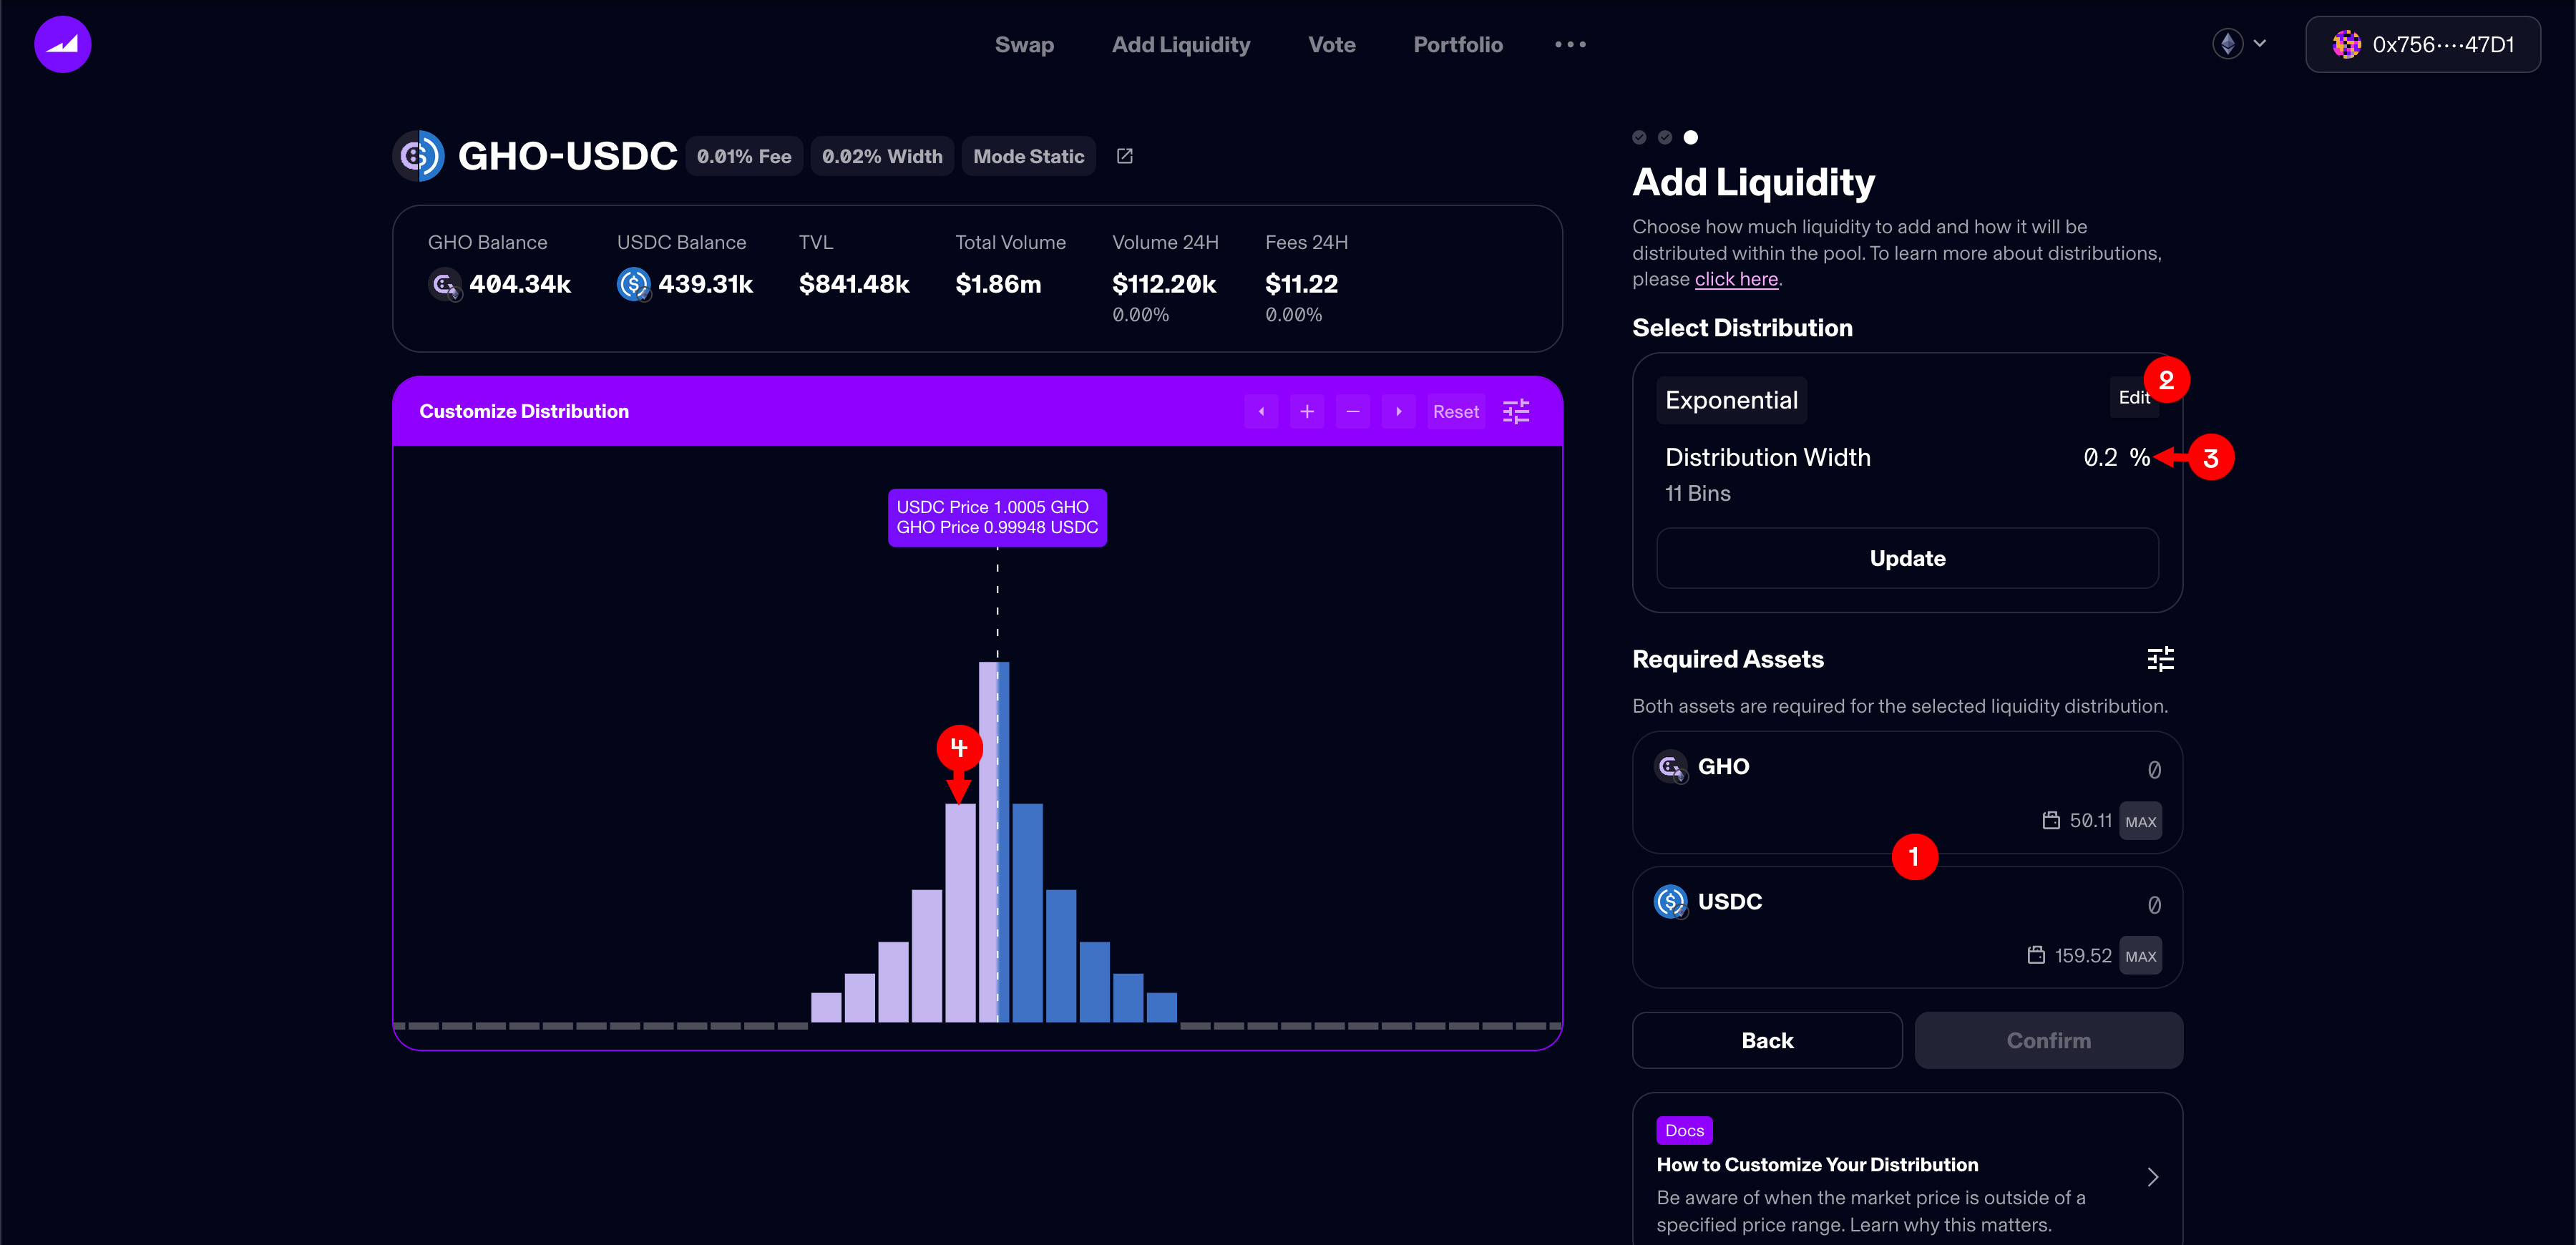
The screenshot above shows the Add Liquidity page after a user has selected Mode Static. The two token boxes on the right (1) are used to set the overall amount of liquidity you wish to add to the pool. These are interactive with the distribution chart on the left, meaning that the AMM will automatically compute the correct ratios of the two tokens required by your current distribution.
You can use the Edit button (2) in the Select Distribution section to choose an initial distribution model for you to use or customize. The options are:
Exponential
Flat
Single Bin
For more information on distributions, please see our Understanding Modes section.
You can also edit the Distribution Width (3) to change the overall width of your distribution across the pool's price range. By default, this is set to 0.1%, meaning that your distribution will span 0.1% of the total price range, plus the current active bin as a center point. The UI will automatically calculate the number of bins required to cover this width. The number of bins required will depend on the bin width in the pool (the wider the bins, the fewer will be required to cover the width of your distribution). A pool with a 0.01% bin width will require 11 bins to cover a distribution width of 0.1% (10 bins plus the current active bin).
Larger distribution widths will cost more gas. Please keep this in mind when adjusting your distribution width.
If you want to change the Distribution Width, edit the numeric field at (3) and then click the Update button. The distribution chart will refresh to show the new distribution.
You can tweak the shape of any of the distributions by clicking the top of a bin (e.g., at (4)) and dragging the bin up and down. Bin height corresponds to amount of liquidity in the bin, and as you move the bin heights you will see the amounts on the right (1) change accordingly. The active bin contains both tokens, so moving it will affect both token amounts. The bins to either side of the active bin are single token bins, so will only affect one of the tokens.
Once you have finished customizing the size and distribution of your position, you can click Confirm to continue.
Confirming Your Pool Transaction
Please note, the first time you use any token on Maverick, you will be asked to Approve that particular token. UI buttons like Swap/Confirm Amount will show as Approve [Token] until that token has been approved. Approving a token requires you to confirm the choice in a software cryptocurrency wallet pop-up. You may also need to set an appropriate spending allowance. Read more here.
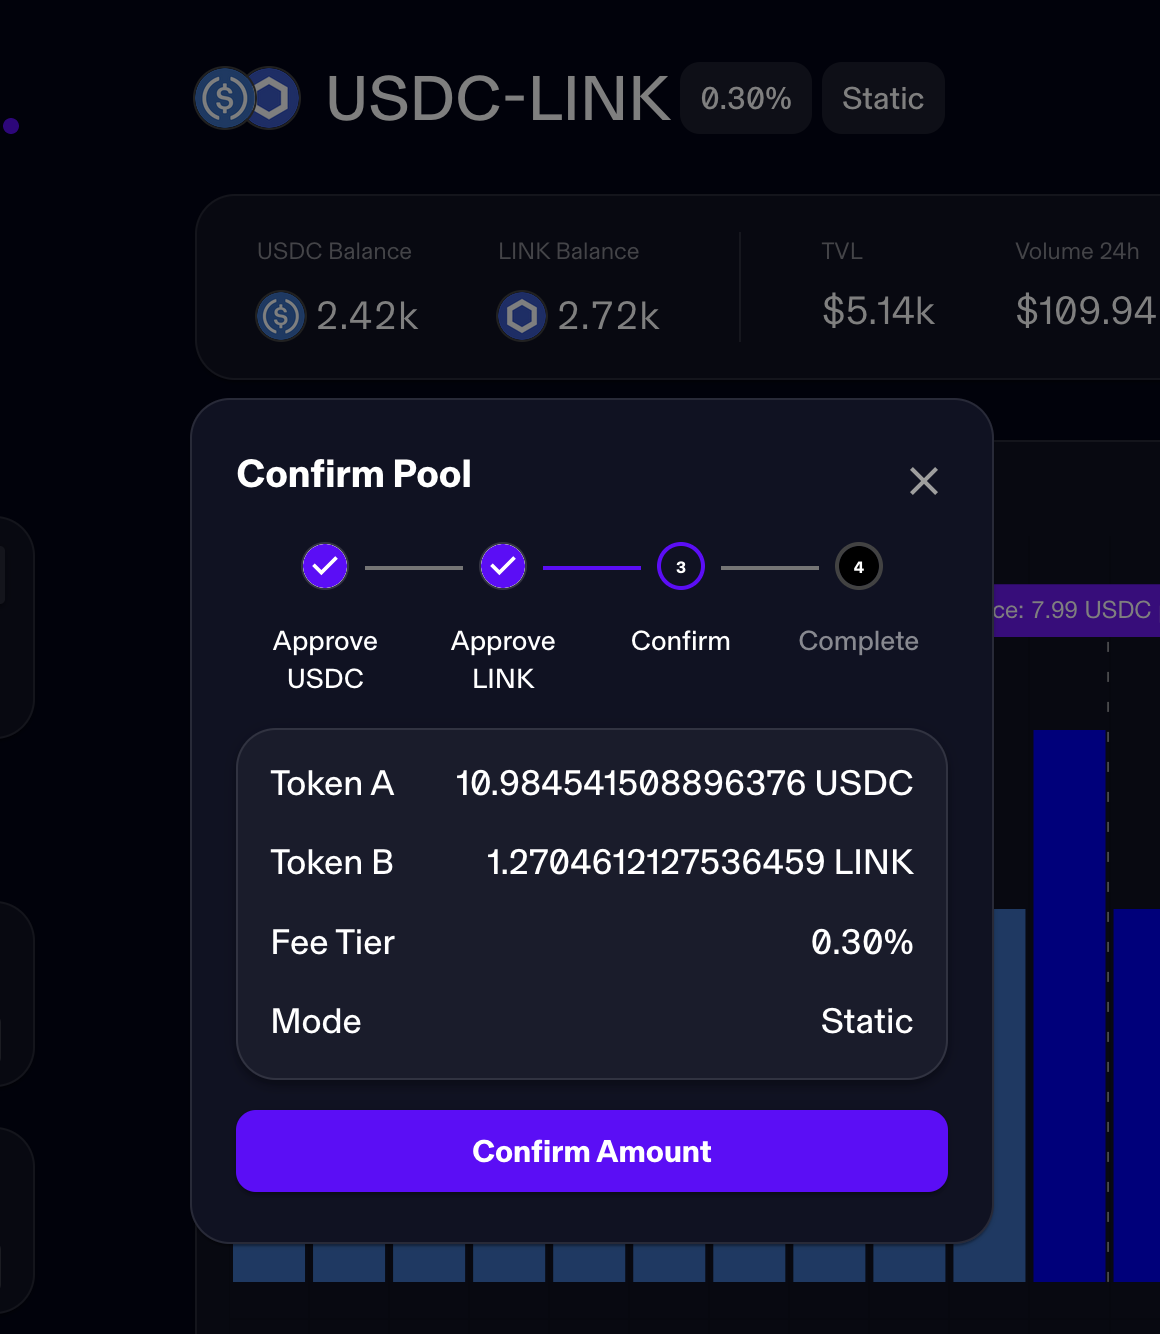
Clicking the Confirm button will open the Confirm Pool modal. This modal will walk you through the final steps necessary to add liquidity to the pool. If you have yet to approve either token on Maverick, you will first be asked to approve them. In the screenshot above, USDC and LINK have already been approved, so the modal has advanced to the third step.
The modal will present a summary of your proposed transaction, including the amounts of each token to be deposited from your wallet, the chosen Fee Tier for your pool, and the Mode you are using for your liquidity. If everything looks correct, click Confirm Amount to send the transaction to MetaMask for approval. If you need to edit something, you can click the X at the top right of the modal to return to the Add Liquidity flow.
If you click Confirm Amount, a pop-up window should appear asking you to confirm the transaction in your wallet. Confirm the transaction. After a short wait, you will see a green pop-up window that reads "Add Liquidity Successful." You can now choose to review the transaction on Explorer or close the modal to be taken to the Portfolio page, where you can track all of your liquidity positions on Maverick.
Last updated